When To Wrap Brisket: The Ultimate Guide For BBQ Perfection
So, you're diving into the world of BBQ and you're wondering, "When to wrap brisket?" Well, my friend, you're in the right place. Wrapping brisket is one of those techniques that can make or break your cook, and trust me, it’s not as simple as just throwing some foil over it. The timing, the method, and the materials all play a role in creating that tender, juicy masterpiece we all dream about. So, let's break it down and make sure you're set up for success.
Now, I know what you're thinking—“Is there really a science to wrapping brisket?” The answer is yes, absolutely. Wrapping brisket at the right time can help lock in moisture, speed up cooking, and give you that beautiful bark you’ve been craving. But if you do it too early or too late, you might end up with a dry brisket or one that’s overly mushy. Yikes! Nobody wants that.
Here’s the good news: by the end of this guide, you’ll have all the info you need to master the art of brisket wrapping. Whether you’re cooking for a family gathering or just treating yourself to a weekend feast, this article’s got you covered. Let’s dive in!
- Wheres The Party At Discover The Location Of Cma Awards
- Exploring The Best Asian Food Market In Phoenix Az A Flavorful Journey
Table of Contents:
- Brisket Basics
- Why Wrap Brisket?
- When to Wrap Brisket
- Wrapping Methods
- Choosing the Right Materials
- Temperature Zones
- Resting and Finishing
- Common Mistakes to Avoid
- Pro Tips for Perfect Brisket
- Wrapping It All Up
Brisket Basics
Before we jump into the nitty-gritty of wrapping brisket, let’s talk about the star of the show: the brisket itself. Brisket is a cut of beef that comes from the lower chest or breast of the cow. It’s a tough cut with lots of connective tissue, but when cooked low and slow, it transforms into something magical. The fat melts, the collagen breaks down, and you’re left with tender, flavorful meat that just falls apart.
Now, there are two main parts of the brisket: the flat and the point. The flat is leaner and more uniform, while the point is fattier and more flavorful. Some folks like to cook them together, while others prefer to separate them. It all depends on your preference and the type of brisket you’re working with.
- Conor Mcgregor Height The Real Story Behind The Legends Stature
- Eazye Death Age The Untold Story Behind The Iconic Rappers Legacy
Brisket Cuts and Sizes
Here’s a quick breakdown of the different types of brisket you might encounter:
- Whole Packered Brisket: This includes both the flat and the point, and it’s what most people think of when they hear “brisket.”
- Brisket Flat: Just the leaner section, great for slicing.
- Brisket Point: The fattier part, perfect for making burnt ends or pulled brisket.
Why Wrap Brisket?
Okay, so why do we even bother wrapping brisket in the first place? Great question! Wrapping serves a few key purposes:
- Moisture Control: Wrapping helps prevent the brisket from drying out during the long cooking process.
- Speeding Up Cook Time: By trapping steam inside the wrap, you can reduce the overall cooking time.
- Enhancing Flavor: Depending on the material you use, wrapping can infuse additional flavors into the meat.
Now, some pitmasters swear by the “Texas Crutch,” which involves wrapping the brisket in foil or butcher paper. Others prefer to let it cook uncovered the whole time. But let’s be real—wrapping can be a game-changer if done right.
When to Wrap Brisket
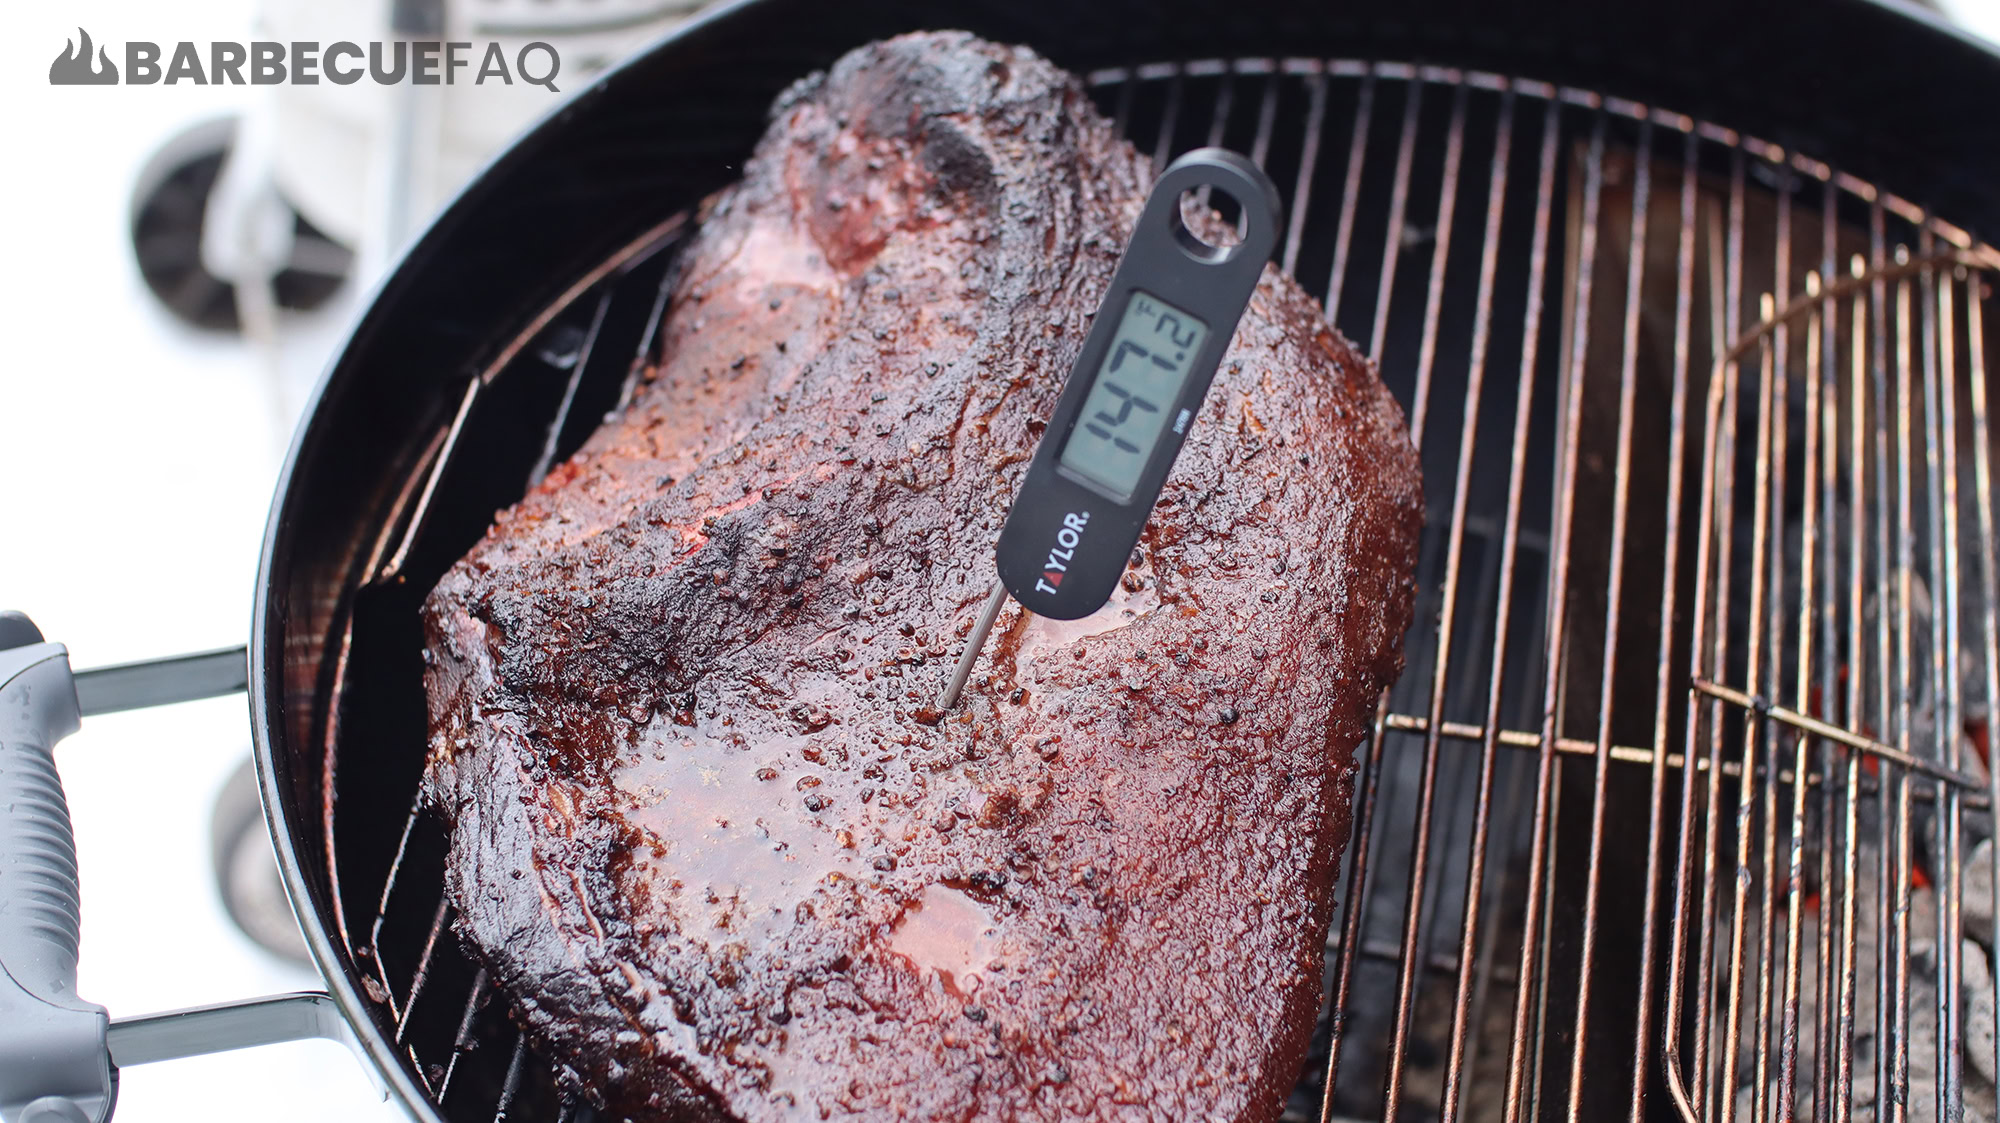
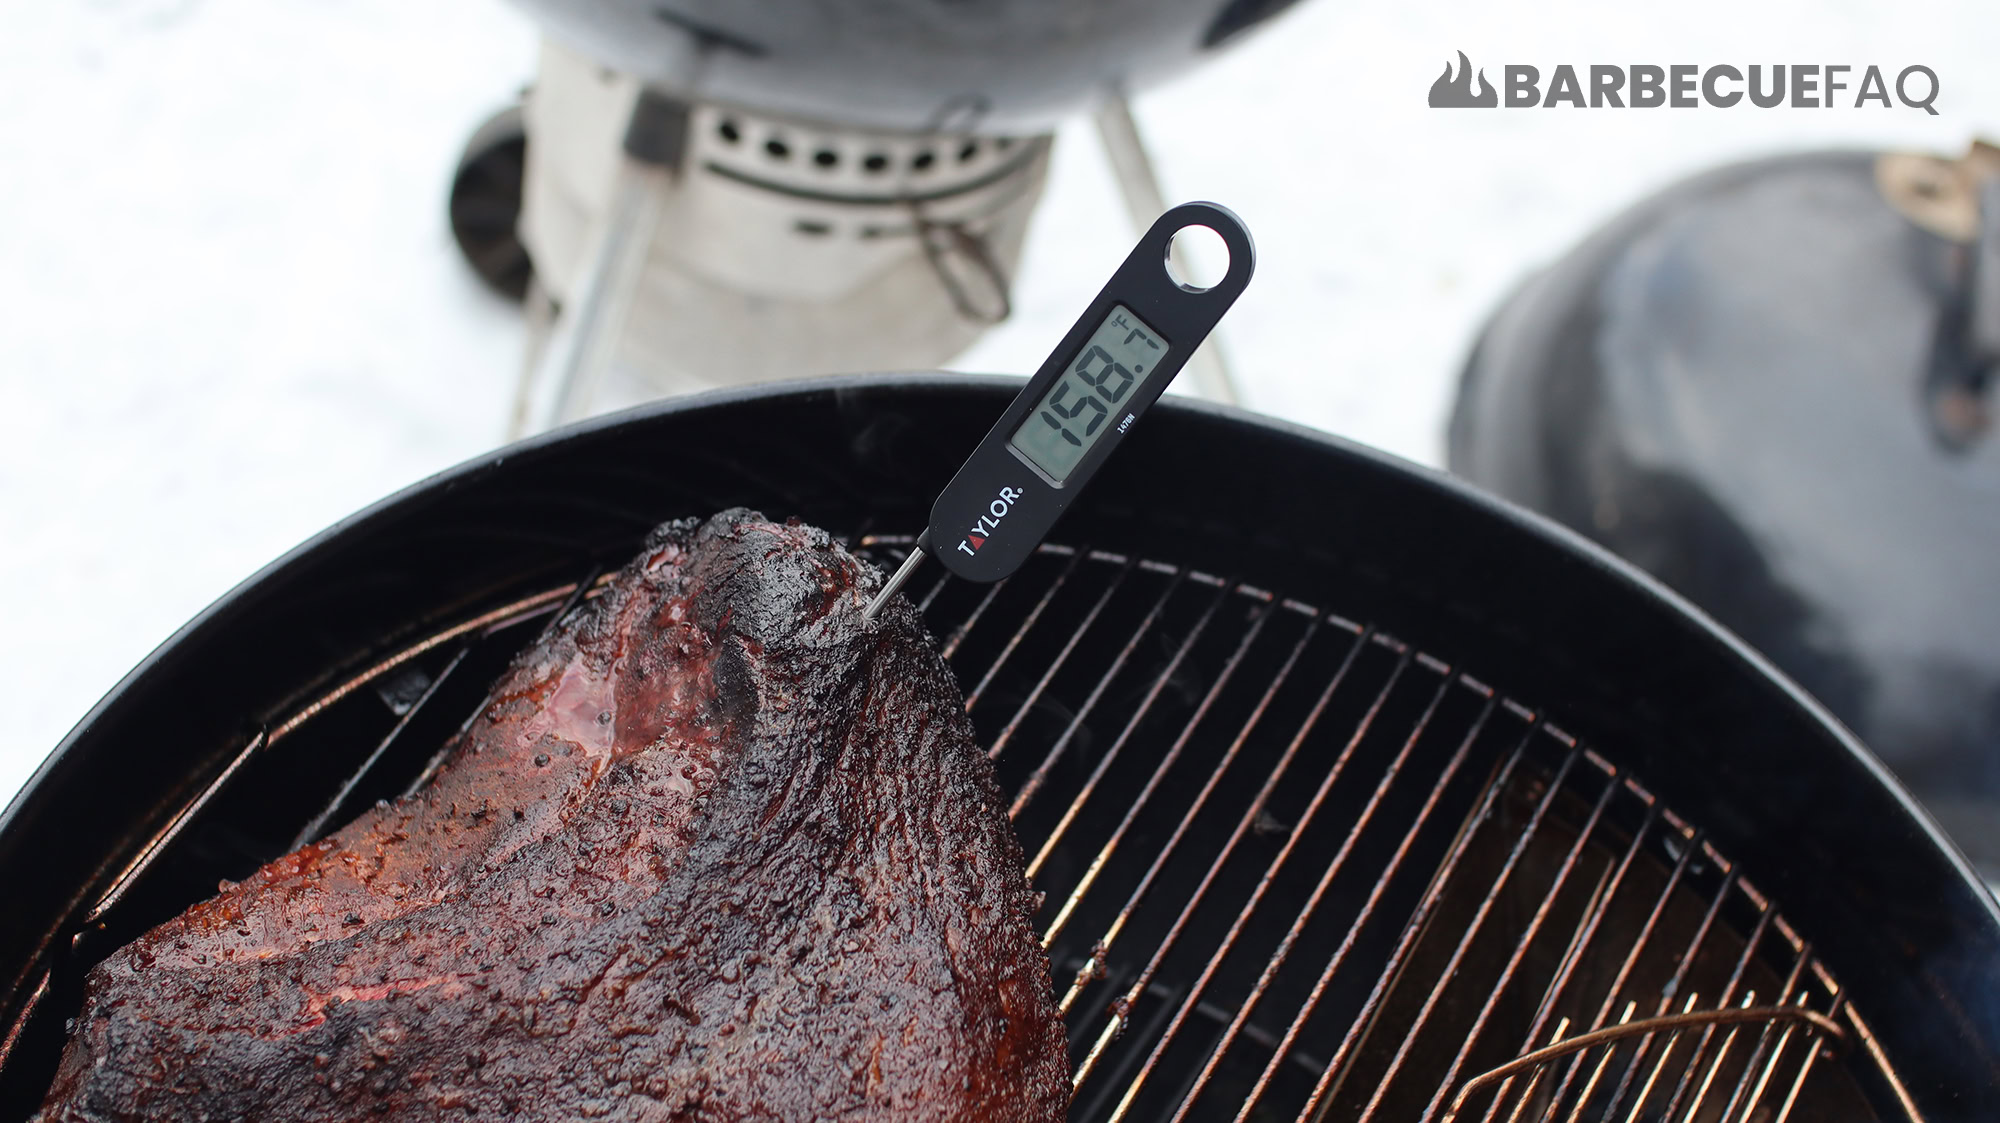
This is the million-dollar question, isn’t it? The general rule of thumb is to wrap brisket once it hits the "stall." The stall is that frustrating period where the internal temperature of the brisket stops rising because the moisture evaporates and cools the surface. It usually happens around 160-170°F (71-77°C).
But here’s the thing: not everyone wraps at the stall. Some folks wait until the brisket reaches 180°F (82°C) or higher before wrapping. It all depends on your desired texture and flavor profile. If you want a crispier bark, you might hold off on wrapping for a bit longer. On the other hand, if you’re worried about the brisket drying out, wrapping sooner could be the way to go.
Factors That Influence Wrapping Time
Several factors can affect when you should wrap your brisket:
- Size of the Brisket: Larger cuts will take longer to cook and may benefit from wrapping earlier.
- Cooking Temperature: Higher temps can speed up the process, but they also increase the risk of drying out the meat.
- Weather Conditions: Humidity levels and wind can impact how quickly the brisket dries out.
Wrapping Methods
There are a few different ways to wrap brisket, and each has its own pros and cons. Let’s take a look at the most common methods:
1. Texas Crutch (Foil)
This classic method involves wrapping the brisket in aluminum foil. It’s great for speeding up cook time and keeping the meat moist, but it can also result in a softer bark. If you go this route, make sure to double-wrap the brisket to prevent leaks.
2. Butcher Paper
Butcher paper is becoming increasingly popular among pitmasters because it allows for some airflow while still trapping moisture. This can give you a nice balance between tenderness and bark texture. Just make sure to use high-quality, food-grade butcher paper.
3. No Wrap (Low and Slow)
Some purists prefer to cook their brisket uncovered the entire time. This method can produce an amazing bark, but it also requires more patience and attention to prevent the meat from drying out.
Choosing the Right Materials
Not all wraps are created equal. Here’s a quick guide to help you choose the best material for your brisket:
Aluminum Foil
Foil is cheap, easy to use, and effective at sealing in moisture. However, it can also steam the brisket, which might not be ideal if you’re aiming for a crispy bark. If you do use foil, consider unwrapping the brisket for the last hour or so of cooking to let it develop some color.
Butcher Paper
Butcher paper strikes a nice balance between moisture retention and airflow. It’s a bit more expensive than foil, but many pitmasters swear by it for achieving that perfect bark. Just make sure to pre-soak the paper before wrapping to help it stay intact during cooking.
Cotton Liners
Some folks use cotton liners or towels to wrap their brisket. This method is less common but can work well if you’re looking for a more rustic approach. Just be sure to soak the liner in water or apple juice to keep it from burning.
Temperature Zones
Temperature is key when it comes to cooking brisket. Here’s a breakdown of the different temperature zones and what they mean for your cook:
1. The Stall (160-170°F)
This is where the brisket stops rising in temperature due to moisture evaporation. Wrapping at this stage can help you push through the stall and get back on track.
2. The Sweet Spot (195-205°F)
This is the ideal temperature range for tender, juicy brisket. Once your meat hits this zone, it’s time to start thinking about resting and finishing.
3. Overcooked Danger Zone (210°F+)
If you let the brisket cook too long, it can become mushy and lose its texture. Keep an eye on the temp and don’t let it linger in this zone for too long.
Resting and Finishing
Once your brisket is cooked to perfection, it’s time to let it rest. Resting allows the juices to redistribute throughout the meat, ensuring that every bite is as juicy as possible. Here’s how to do it:
Wrap the brisket in foil or butcher paper and place it in an insulated cooler for at least an hour (two hours is even better). This will help it retain heat and moisture while you prepare for serving. When it’s time to slice, make sure to cut against the grain for maximum tenderness.
Common Mistakes to Avoid
Even the best pitmasters make mistakes sometimes. Here are a few common errors to watch out for:
1. Wrapping Too Early
If you wrap the brisket too early, you risk steaming it and losing that beautiful bark. Wait until the stall or slightly beyond to ensure the best results.
2. Not Wrapping at All
While some folks prefer the no-wrap method, it can be risky if you’re not careful. Make sure to monitor the brisket closely to prevent it from drying out.
3. Cutting Too Soon
Slicing the brisket before it has a chance to rest can cause all those delicious juices to run out. Be patient and let it rest for at least an hour before digging in.
Pro Tips for Perfect Brisket
Here are a few extra tips to help you take your brisket game to the next level:
- Inject for Extra Flavor: Use a meat injector to add marinade or broth to the brisket before cooking.
- Use a Smoker Thermometer: A good thermometer can make all the difference when it comes to monitoring internal temps.
- Experiment with Woods: Different types of wood can add unique flavors to your brisket. Try oak, hickory, or pecan for a classic BBQ taste.
Wrapping It All Up
So, there you have it—everything you need to know about when to wrap brisket. From understanding the stall to choosing the right materials, mastering this technique can elevate your BBQ skills to new heights. Remember, practice makes perfect, so don’t be afraid to experiment and find what works best for you.
Now it’s your turn! Have you tried wrapping brisket before? What method do you prefer? Leave a comment below and let me know. And if you found this guide helpful, don’t forget to share it with your fellow BBQ enthusiasts. Happy cooking, y’all!
- 19th Nov Zodiac Sign Discover The Mystical Scorpio Energy
- Dannielynn Smith Net Worth The Inside Scoop Youve Been Waiting For
When to Wrap Brisket Temperature, Color, and More Barbecue FAQ
When to Wrap Brisket Temperature, Color, and More Barbecue FAQ

When to Wrap Brisket Temperature, Color, and More Barbecue FAQ
